I grew up in the era when hoodies were cool. Hoodies are pretty much my go-to items when I just want something to lounge around in.
Back in high school, I pretty much lived in my hoodies because I hated putting outfits together and fussing about what to wear.

I'm just going to confess now that I am no fashionista and that I have no sense of style.
I have an affinity for bunnies. In fact, I used to have a pet bunny! She was so soft and cuddly.
And here's a fun fact: did you know that in parts of Canada, a hooded sweatshirt or a hoodie is referred to as a "bunny hug"? What a coincidence, right?!
BB also loves bunnies. She has a bunny lovey that she loves carrying around with her everywhere.

I loved creating something that defined me, so that's when I came up with this amigurumi bunny wearing a hoodie.
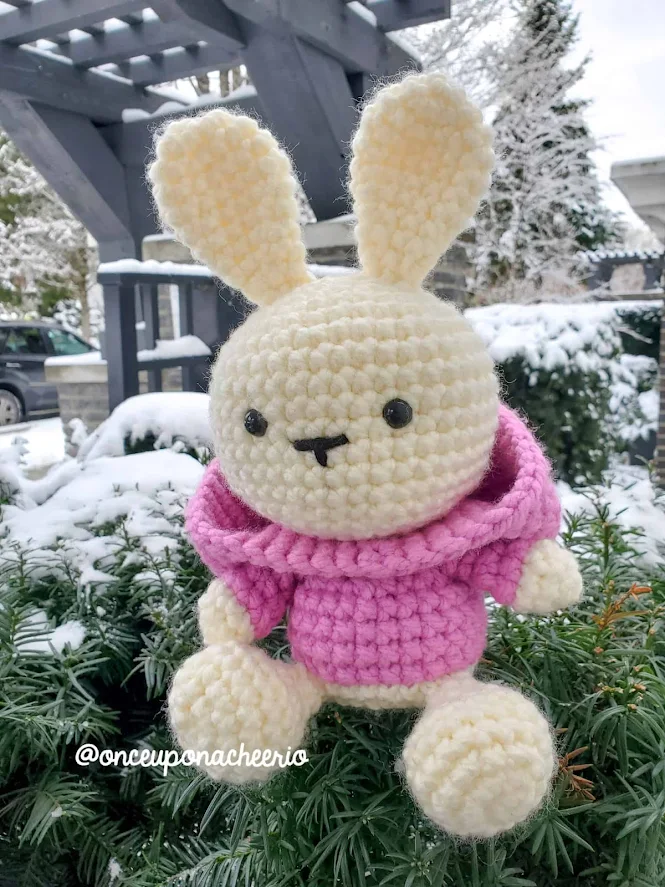
I am very proud of this creation. And you can see from the photos that the hood comes off (like a real hoodie)!

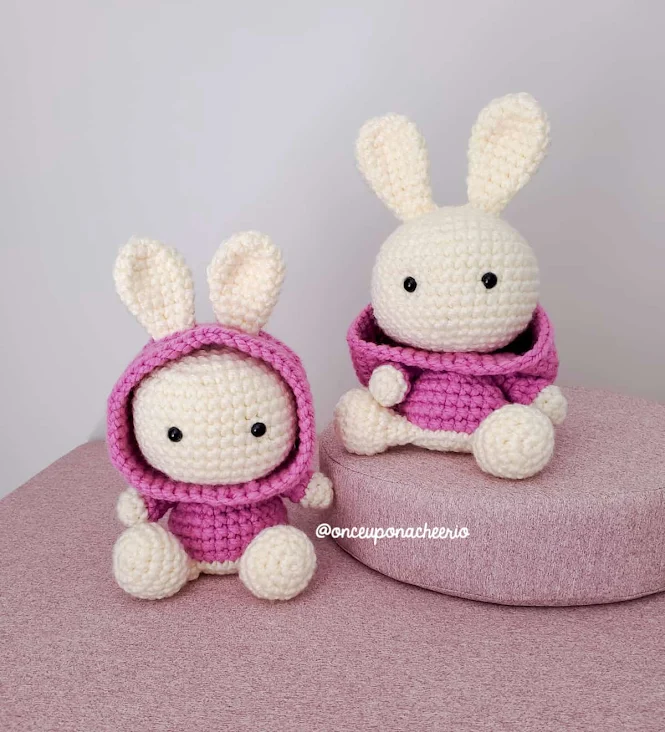
Recently, I got the opportunity to recreate my hoodie amigurumi bunny using some bulky weight yarn, which resulted in a cuddle-sized amigurumi bunny! So I made one with the T-shaped nose embroidery and one without. Which one do you like better?
I applied some new crochet techniques that I've learned along the way such as the half-color change technique to help create a cleaner color change between two rows (i.e. the body and the hoodie color).

Remember to like Once Upon a Cheerio on Facebook. I'd also love it if you followed @onceuponacheerio on Instagram!
Don't have time to make it right this instant? Pin it for later!

This crochet pattern is available for FREE on this website. If you'd like an ad-free, printable PDF version, you can purchase it for a small fee from my Ravelry shop.
What You Need / Materials
Most of these items can be purchased through our affiliate links. Purchasing items through these links will not cost you any extra money. Please see our disclosure policy for more details.
- Worsted weight yarn in 2 colors (Color A for the bunny, Color B for the hoodie)
- 4.0 mm Crochet Hook
- Safety Eyes (I used 6.0 mm)
- Poly-fil or any Polyester Stuffing of your choice
- Yarn Needle
- Stitch Markers
- Scissors
Notes
- This is a beginner-friendly crochet pattern.
- In the newer version of the amigurumi hoodie bunny, I used a method called "Yarn Under Single Crochet". This technique makes the stitches tighter and more aligned. You can tell when someone is using this method when the stitches look like little Xs.
- In the newer version, I also used the half-color change technique in order to achieve cleaner lines when changing colors from one row to another.
- You can make this amigurumi bunny with any weight yarn you like as long as you consistently use the same yarn weight throughout the pattern. For example, I used bulky weight yarn for my latest remake.
Stitches & Abbreviations
- ch - chain
- sc - single crochet
- st/sts - stitch/stitches
- sc inc - single crochet increase, 2 single crochets in one stitch
- sc dec - single crochet decrease, single crochet 2 stitches together
- BLO - back loop only
Amigurumi Hoodie Bunny Crochet Pattern
Head
Using a 4.0 mm crochet hook and Colour A yarn...
Round 1: Magic Ring with a base of 6 sc (6 sts)
Round 2: Sc inc in each st around (12 sts)
Round 3: [Sc, sc inc] x 6 times (18 sts)
Round 4: [2 sc, sc inc] x 6 times (24 sts)
Round 5: [3 sc, sc inc] x 6 times (30 sts)
Round 6: [4 sc, sc inc] x 6 times (36 sts)
Round 7: [5 sc, sc inc] x 6 times (42 sts)
Round 8-14: Sc in each st around (42 sts)
Insert the safety eyes between rows 11 and 12
Round 15: [5 sc, sc dec] x 6 times (36 sts)
Round 16: [4 sc, sc dec] x 6 times (30 sts)
Round 17: [3 sc, sc dec] x 6 times (24 sts)
Stuff firmly as you continue to decrease.
Round 18: [2 sc, sc dec] x 6 times (18 sts)
Round 19: [Sc, sc dec] x 6 times (12 sts)
Fasten off and leave a tail to sew onto the hood.
Ears (make 2)
Using a 4.0 mm crochet hook and Colour A yarn...
Round 1: Magic Ring with a base of 5 sc (5 sts)
Round 2: Sc inc in each st around (10 sts)
Round 3: [Sc, sc inc] x 5 times (15 sts)
Round 4-5: Sc in each st around (15 sts)
Round 6: [3 sc, sc dec] x 3 times (12 sts)
Round 7: Sc in each st around (12 sts)
Round 8: [2 sc, sc dec] x 3 times (9 sts)
Round 9: Sc in each st around (9 sts)
Round 10: [Sc, sc dec] x 3 times (6 sts)
Fasten off and leave a tail to sew onto the head.
Hood
Using a 4.0 mm crochet hook and Colour B yarn...
Round 1: Magic Ring with a base of 6 sc (6 sts)
Round 2: Sc inc in each st around (12 sts)
Round 3: [Sc, sc inc] x 6 times (18 sts)
Round 4: [2 sc, sc inc] x 6 times (24 sts)
Round 5: [3 sc, sc inc] x 6 times (30 sts)
Round 6: [4 sc, sc inc] x 6 times (36 sts)
Round 7: [5 sc, sc inc] x 6 times (42 sts)
Round 8: [6 sc, sc inc] x 6 times (48 sts)
Round 9-12: Sc in each st around (48 sts)
Round 13: Sc in the next 16 sts, chain 7, skip 7 sts, and then sc in the next 2 sts, chain 7, skip 7 sts, and then sc in the next 16 sts (48 sts)
Round 14-16: Sc in each st around (48 sts)
Feel free to do an extra round or two of sc if you want the hood to extend a little toward the face.
At this point, you might want to attach the ears to the head and try measuring to see if the hood fits the bunny. Depending on the thickness of your yarn and the tension, you might have to increase or decrease a row between rows 9-12.
Body
Using a 4.0 mm crochet hook and Colour A yarn...
Round 1: Magic Ring with a base of 7 sc (7 sts)
Round 2: Sc inc in each st around (14 sts)
Round 3: [Sc, sc inc] x 7 times (21 sts)
Round 4: [2 sc, sc inc] x 7 times (28 sts)
Round 5: Sc in each st around (28 sts)
Change to Colour B yarn...
Round 6: Slst in BLO of each st around (28 sts)
Round 7: Sc in the BLO of each st around (28 sts)
Round 8-10: Sc in each st around (28 sts)
Round 11: [2 sc, sc dec] x 7 times (21 sts)
Round 12: [Sc, sc dec] x 7 times (14 sts)
Fasten off and leave a tail to sew onto the hood.
Arms (make 2)
Using a 4.0 mm crochet hook and Colour A yarn...
Round 1: Magic Ring with a base of 6 sc (6 sts)
Round 2: [Sc, sc inc] x 3 times (9 sts)
Round 3: Sc in each st around (9 sts)
Change to Colour B yarn...
Round 4: Slst in each st around (9 sts)
Round 5: Sc in the BLO of each st around (9 sts)
Round 6: [Sc, sc dec] x 3 times (6 sts)
Round 7-8: Sc in each st around (6 sts)
Fasten off and leave a tail to sew onto the body.
Legs (make 2)
Using a 4.0 mm crochet hook and Colour A yarn...
Round 1: Magic Ring with a base of 6 sc (6sts)
Round 2: Sc inc in each st around (12 sts)
Round 3: [Sc, sc inc] x 6 times (18 sts)
Round 4-6: Sc in each st around (18 sts)
Round 7: [Sc, sc dec] x 6 times (12 sts)
Stuff firmly as you continue to decrease.
Round 8: Sc dec in each st around (6 sts)
Round 9: Sc in each st around (6 sts)
Fasten off, leaving a tail to sew onto the body.
Tail
Using a 4.0 mm crochet hook and Colour A yarn...
Round 1: Magic Ring with a base of 6 sc (6 sts)
Round 2: Sc inc in each st around (12 sts)
Round 3: Sc in each st around (12 sts)
Round 4: Sc dec in each st around (6 sts)
Fasten off and leave a tail to sew to the body.
After that, you basically have all your pieces ready to go.

FYI, this photo is missing the tailpiece
Assembly
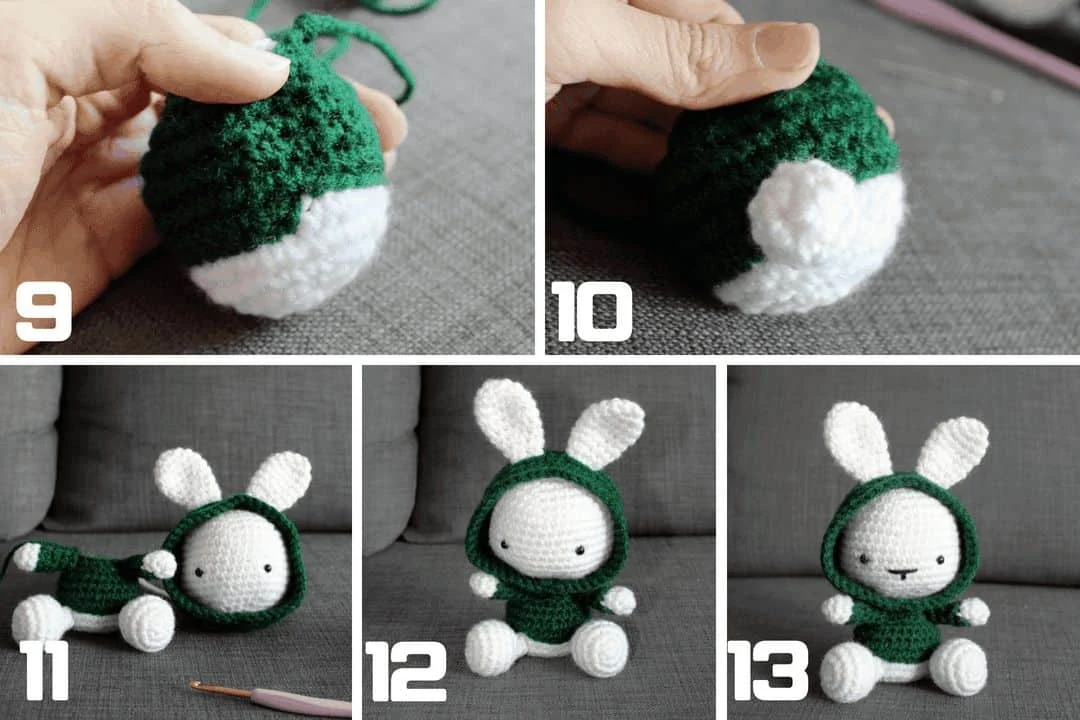
On the hood, you have two slits, these are for your bunny's ears. To line them up correctly, the ears should sit right on top of the head. I attached it right after the first round (photo 2)

Then, position your bunny's head by placing it inside the hood with the ears through the slits. Make sure that your bunny's eyes are facing outside.
Using the long strand that you left on the head, sew the bottom of the head to the bottom of the hood (photo 7).
On the bottom of the hood where you sewed the head, you'll see the yarn in Colour A but don't worry as this will be hidden once the body is attached.

Next, attach your tail to the body, as well as the arms and legs. And then attach the head along with the hood to the body.
If the head and body are attached properly, you should no longer be able to see Colour A yarn on the bottom of the hood. After that, you sew on the details of the bunny's face and then you're done!

And there you have it your very own Bunny in the Hood! Look at that, a family reunion! I also have a crochet pattern for the classic (and naked) amigurumi bunny crochet pattern.

Did you make your own Hoodie Amigurumi Bunny? I'd love to see it! Please share it with me on Instagram and/or use the #onceuponacheerio hashtag.
This is an original crochet pattern written by Juli Anne of Once Upon a Cheerio. Please do not claim this crochet pattern as your own. If you wish to share this crochet pattern, you may link to this blog post but please do not reprint it on your site. You may keep a copy for personal use but please DO NOT sell or distribute the crochet pattern.
You may sell products made from this crochet pattern, but please clearly credit the design to me, Juli Anne of Once Upon a Cheerio and provide a link to my blog www.OnceUponaCheerio.com. Permission is NOT granted for mass production or factory manufacturing of any kind. Thank you for understanding!
You may sell products made from this crochet pattern, but please clearly credit the design to me, Juli Anne of Once Upon a Cheerio and provide a link to my blog www.OnceUponaCheerio.com. Permission is NOT granted for mass production or factory manufacturing of any kind. Thank you for understanding!


This was a great patten it took a while to make but it was well worth it
very cute! thanks for the awesome pattern
This is so sweet it gives me a toothache! I never used or heard of the *yarn under single crochet" method. I love it so much! Great pattern, thanks for generously making it *free.*
Post a Comment