When you hear 100% cotton yarn, you immediately think it should be lightweight, breathable, etc. What I didn't know was that there are different types of cotton yarn.
When I bought two large skeins of Bernat Handicrafter Cotton yarn, I was expecting my shawl to be lightweight and draped beautifully on my shoulders. Instead, it turned out to be stiff and heavy.
I thought that cotton yarn was just that: cotton yarn. I went ahead anyway and used a majority of the yarn to make and finished my shawl. But because it was so heavy, I rarely actually use it.
On the other hand, it makes a great weighted blanket for the kids during the warmer weather.
I had some yarn left over and wondered what I should do with it.
Many people suggested that Bernat Handicrafter yarn is a kitchen cotton type of yarn and that they make great dishcloths out of it. But I feel that's a lot of work for a dishcloth that's going to get all dirty. I'd prefer something that lasts a little longer.
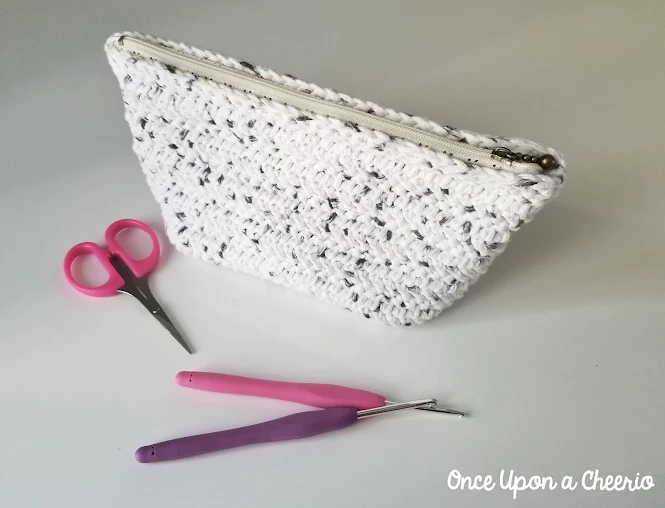
I then started using it to explore different stitches and tried my hand at making a purse. Unfortunately, I think I was too ambitious, so let's start with something a little bit smaller - like a zippered pouch!

Remember to like Once Upon a Cheerio on Facebook. I'd also love it if you followed @onceuponacheerio on Instagram!
Don't have time to make it right this instant? Pin it for later!
Herringbone Crochet Zipper Pouch FREE Pattern
What You Need / Materials
Most of these items can be purchased through our affiliate links. Purchasing items through these links will not cost you any extra money. Please see our disclosure policy for more details.- Bernat Handicrafter Cotton Yarn (I used the color, "salt and pepper")
- 4.0 mm Crochet Hook Zipper (9" or whatever size is needed to cover the width of your pouch once finished)
- Yarn Needle
- Stitch Markers
- Scissors
Notes
- Instead of using a yarn needle, I often like to use single crochet stitches to seam up the sides
- The herringbone double crochet stitches create a shallow zig-zag edge rather than a straight edge. To make seaming up the sides easier, I added a row of single crochets along the edge of the herringbone double crochet rows so I have a straight edge to work with.
- The zipper is sewn onto the pouch at the end.
- The stitches for this pouch are dense enough that it's not required to have a fabric lining, but it is definitely optional if you like.
Stitches & Abbreviations
- st/sts - stitch/stitches
- ch - chain
- sc - single crochet
- hbdc - herringbone double crochet
FREE Crochet Pattern
Base
Ch 11
Row 1: Sc into the second ch from the hook, sc across (10 sc)
Row 2-22: Ch 1, turn, sc across (10 sc)
Cut and fasten off.

Side of Pouch
Row 1: Ch 5, sc into the corner of the base piece and across the long edge (22 sc), ch 7
Row 2: Hbdc into the second ch from the hook, hbdc into the next 4 ch, hbdc into the next 22 sc sts, hbdc into the last 5 ch (32 sts)
Row 3-13: Ch 2, turn, hbdc across (32 sts)
Cut and fasten off, and do the same thing on the other side of the base.

Assembly
- Fold the piece in half and sew or sc the two sides together only on the edges of the hbdc. See the top 2 photos below (18 sc sts)
- You are then left with a hole in the bottom two corners of the pouch. Pinch the hole to make a T-shape seam, creating a flat bottom for the pouch. Sew or sc the two bottom corners. See the bottom 2 photos below (10 sc sts)

And there you have it! Your very own herringbone zipper pouch that you can use for everything including crochet hooks, makeup brushes, makeup, notions, etc.


Did you make your own Herringbone Zipper Pouch? I'd love to see it! Please share it with me on Instagram and/or use the #onceuponacheerio hashtag.
This is an original crochet pattern written by Juli Anne of Once Upon a Cheerio. Please do not claim this crochet pattern as your own. If you wish to share this crochet pattern, you may link to this blog post but please do not reprint it on your site. You may keep a copy for personal use but please DO NOT sell or distribute the crochet pattern.
You may sell products made from this crochet pattern, but please clearly credit the design to me, Juli Anne of Once Upon a Cheerio and provide a link to my blog www.OnceUponaCheerio.com. Permission is NOT granted for mass production or factory manufacturing of any kind. Thank you for understanding!
You may sell products made from this crochet pattern, but please clearly credit the design to me, Juli Anne of Once Upon a Cheerio and provide a link to my blog www.OnceUponaCheerio.com. Permission is NOT granted for mass production or factory manufacturing of any kind. Thank you for understanding!


This is so cute! How do you attach the zipper at the end?
Hey Stella! The zipper was just sewn on at the end.
Post a Comment