It feels like it takes me forever to publish new content on my blog. The truth is that it's not that easy to come up with your own crochet patterns, write them out, test them, photograph them, and edit them.
I have a few crochet patterns for my Mini Mimi amigurumi doll that I've created. I just haven't had the time to write out the crochet patterns from my messy notes. So make sure to watch out for those coming soon!
Hair adds so much character to an amigurumi doll, and I really wish I was better at doing amigurumi hair. I have tried many amigurumi hair tutorials but I think this is probably still my favorite method.
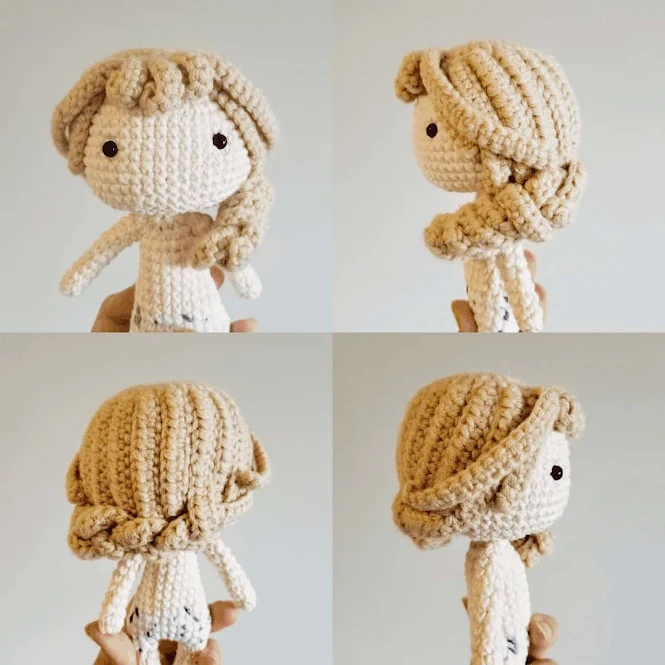
For one, I don't have to cut my yarn hair into little pieces. So if I decide on a different hairstyle in the middle of doing my amigurumi's hair, I don't have to yank out all the little pieces of yarn and have them go to waste.
Second, I can crochet which is still my favorite activity.
Also, the hair stays put for the most part and doesn't go messy, which is a wonderful bonus!
This hairstyle was inspired by Elsa from Disney's Frozen. But I think it would pass for an elegant wedding hairstyle if you were hoping to make wedding amigurumi dolls.
Coming up with a crochet pattern takes many trials and errors and this blog post for Elsa's side braid hairpiece is a good example of it.
I shared some photographs on my Instagram when I started the process. Despite how good it looked, it was literally more hair than I could style on my amigurumi Elsa.

It took me a good few hours to get it looking the way I want it to. In fact, it was so complicated there was just no way that I would be able to re-create it, let alone write a crochet pattern and tutorial for it.
So, I decided to redo it. I made a new doll and a new hairpiece. And now I can proudly show off an amigurumi hairpiece tutorial that's simpler, and easier to follow.
I have to say, I think I like this one more than my first "prototype". Tell me what you think!
Remember to like Once Upon a Cheerio on Facebook. I'd also love it if you followed @onceuponacheerio on Instagram!
Don't have time to make it right this instant? Pin it for later!

What You Need / Materials
Most of these items can be purchased through our affiliate links. Purchasing items through these links will not cost you any extra money. Please see our disclosure policy for more details.- Mini Mimi Doll (click here to purchase the PDF crochet pattern on Ravelry)
- Worsted Weight Yarn in the hair color of your choice (I used Loops and Threads Impeccable Solids in Heather)
- 3.0 mm Crochet Hook
- Yarn Needle
- Stitch Markers
- Scissors
Stitches & Abbreviations
- ch - chain
- st/sts - stitch/stitches
- slst - slip stitch
- sc - single crochet
- sc inc - single crochet increase, 2 single crochets in one stitch
- hdc - half double crochet
Notes
- This crochet pattern is just for the hairpiece/wig.
- You can find the free crochet pattern as a crochet-along (CAL) in this blog post and its links: Mini Mimi CAL.
- If you are looking to purchase the ad-free PDF version of the Mini Mimi amigurumi doll, You can visit my Ravelry Store.
- I used the "wrong side" of the hairpiece as her hair.
- There are thin and thick strands of hair in this hairpiece. The thin strands of hair are at the front of the face, and the thick strands of hair are on the back.
- The thin strands of hair are made using single crochet (sc)
- The thick strands of hair are made using half double crochet (hdc)
Amigurumi Doll Hair Crochet Pattern
Using a 3.0 mm crochet hook and worsted weight yarn in the color of your choice...
Round 1: Magic Ring with a base of 6 sc (6 sts)
Round 2: Sc inc in each st around (12 sts)
Round 3: [Sc, sc inc] x 6 times (18 sts)
Round 4: [Sc, sc inc, sc] x 6 times (24 sts)
Round 5: [3 Sc, sc inc] x 6 times (30 sts)
Strand 1: Ch 12, sc into the 2nd ch from the hook and sc up the ch, then slst into the next st on round 5. (11 sts)
Strand 2: Ch 21, sc into the 2nd ch from the hook and sc up the ch, then slst into the next st on round 5 (20 sts)
Strands 3-5: Ch 9, sc into the 2nd ch from the hook and sc up the ch, then slst into the next st on round 5 (8 sts)
Strand 6: Ch 21, sc into the 2nd ch from the hook and sc up the ch, then slst into the next st on round 5 (20 sts)
Strand 7: Ch 12, sc into the 2nd ch from the hook and sc up the ch, then slst into the next st on round 5. (11 sts)
For the rest of the hair strands, there are two different lengths:
- Long Strand (LS): Ch 52, hdc into the 3rd ch from the hook and hdc up the ch, then skip a st on round 5 and slst into the next st (50 sts)
- Short Strand (SS): Ch 16, hdc into the 3rd ch from the hook and hdc up the ch, then skip a st on round 5 and slst into the next st (14 sts)
Strand 8: Repeat LS
Strand 9: Repeat SS
Strand 10: Repeat LS
Strand 11: Repeat SS
Strand 12: Repeat LS
Strand 13-15: Repeat SS
Strand 16: Repeat LS
Strand 17-19: Repeat SS
Assembly
The red numbers are hair strands made using single crochets and the green numbers are hair strands made using half double crochets.

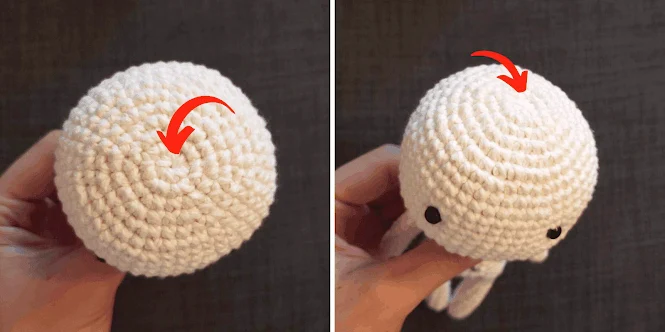
The wrong side of the crochet piece is up, so bring the starting strand of yarn to the inside of the hair wig and attach it to the crown of the head.
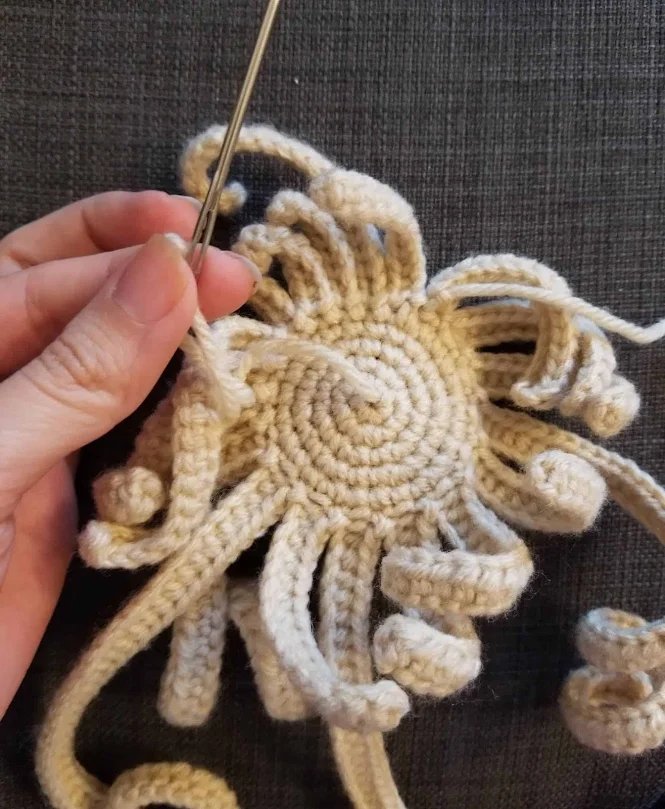
Round 1 of the hair wig is going to be attached to round 1 of the head.
Position and pin down strands 1 and 7 on either side of the head framing the face approximately 3-4 stitches away from the eyes. Then position and pin down strands 13 and 14 to the back of the head.

Pin down the rest of the thick strands (S8-18) of hair and try to cover any bald spots. Then, braid the first three long pieces of hair (S8, S10, S12) on the doll's right side.

Bring the braid along the back of the head and over the shoulder. Using the remaining long strand of hair (S16), wrap it around the braid following its natural curl.
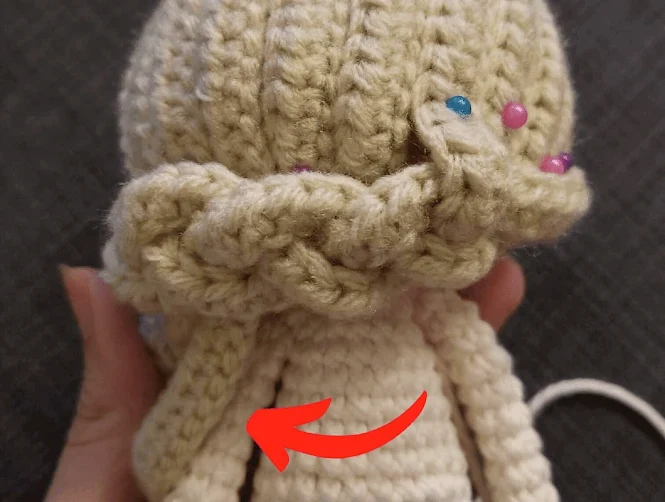
Pin along the braid to hold it in place.
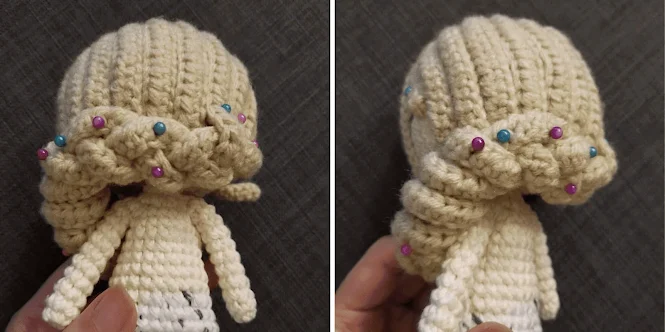
Position the remaining strands of hair (S2 and S6). You can leave it unpinned to frame her face or pin it back along the rest of the hair for a different look.
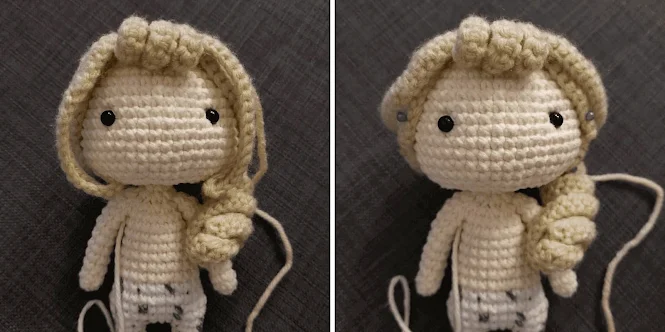
Sadly, amigurumi hairspray does not exist from what I found out when I surveyed on Facebook. So, to help the hair stay in place, use a long piece of yarn of the same color and weave through the hair (small stitches that follow the crochet stitch line) to create "tangled" hair to help it stay in place.
Did you make your own Mini Mimi Doll? I'd love to see it! Please share it with me on Instagram and/or use the #onceuponacheerio hashtag.
This is an original crochet pattern written by Juli Anne of Once Upon a Cheerio. Please do not claim this crochet pattern as your own. If you wish to share this crochet pattern, you may link to this blog post but please do not reprint it on your site. You may keep a copy for personal use but please DO NOT sell or distribute the crochet pattern.
You may sell products made from this crochet pattern, but please clearly credit the design to me, Juli Anne of Once Upon a Cheerio and provide a link to my blog www.OnceUponaCheerio.com. Permission is NOT granted for mass production or factory manufacturing of any kind. Thank you for understanding!
You may sell products made from this crochet pattern, but please clearly credit the design to me, Juli Anne of Once Upon a Cheerio and provide a link to my blog www.OnceUponaCheerio.com. Permission is NOT granted for mass production or factory manufacturing of any kind. Thank you for understanding!


Post a Comment