You know when you're crocheting and you can't fully pay attention to the TV, but you want something entertaining on in the background? The Office is definitely one of my go-to shows to have in the background.
I love the show so much that I probably know all the episodes by heart that I can just have the audio play in my car while driving if I want to.
I was introduced to The Office UK, but I was very young at the time and didn't quite get the humor. It wasn't until I started working that my now-husband introduced me to the American version of The Office.
I was a little reluctant at first. I didn't think that I would like it as much as I do, but it's definitely now one of my top favorite TV shows of all time, next to Friends, of course.

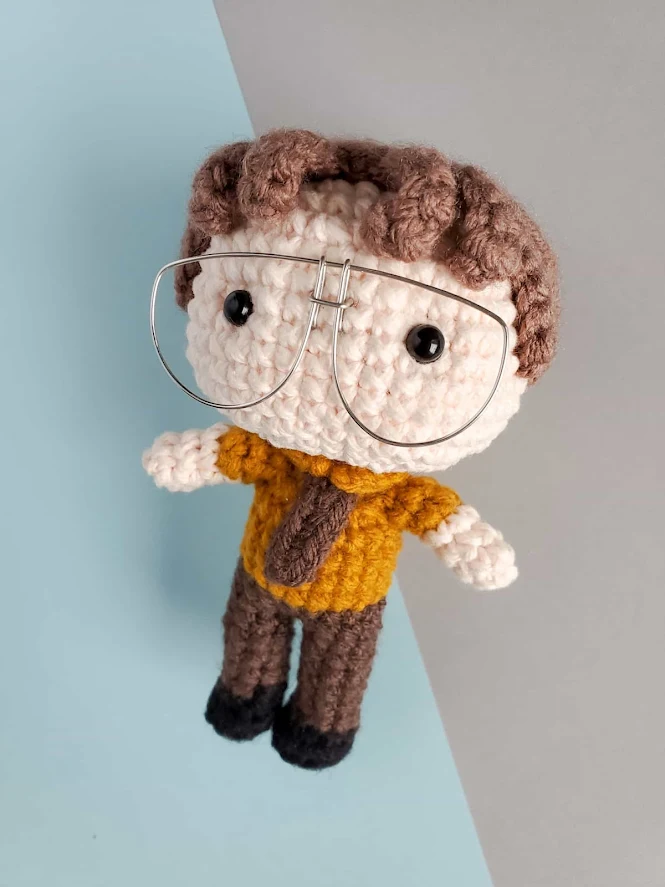
To pay tribute to one of my all-time favorite shows, I decided to make the show's Assistant to the Regional Manager, Dwight Schrute into an amigurumi doll!
As I was working on the doll, I was worried that the resemblance wasn't there. So I brought a picture of the unfinished doll (no hair and no glasses) and asked on The Office subreddit (on Reddit) to see if they see the likeness. I was so happy that they were able to identify him.

It was ironic because soon after, when I was working on the doll in the lunchroom at work one day, one of my co-workers walked in and asked me if I was making Dwight. I didn't even have to tell her it was a character from The Office. I guess Dwight's yellow mustard shirt and brown pants must have given him away.

I'm no wire artist, so his glasses were a bit challenging for me to make. The glasses were made out of two pieces. The nose pieces of the eyeglasses were left longer so they embed into the doll's face. I didn't have to use glue or anything to attach the glasses.
His hair was interesting to make. It's known that Dwight parts his hair in the middle, but how was I going to achieve this with how I make hairpieces on my amigurumi?

Well, my first few renditions of Dwight made him look more like a beloved Backstreet Boy. If you're a fan of the Backstreet Boys, you don't need me to tell you who it is. The fringes were just too long. And Dwight is no Backstreet Boy - he's Dwight K. Schrute!
Anyway, I'd never thought I'd say this, but this Dwight is kinda cute!

Remember to like Once Upon a Cheerio on Facebook. I'd also love it if you followed @onceuponacheerio on Instagram!
Don't have time to make it right this instant? Pin it for later!
Amigurumi Assistant to the Regional Manager Crochet Pattern from the Office

What You Need / Materials
Most of these items can be purchased through our affiliate links. Purchasing items through these links will not cost you any extra money. Please see our disclosure policy for more details.
- Worsted weight yarn in the following colors:
- Peach (I used Lily Sugar N' Cream Scents in Chamomile)
- Mustard Yellow (I used Loops and Threads Impeccable Yarn in Gold)
- Dark Brown (try using Brava Worsted in Sienna)
- Coffee Brown (try using Brava Worsted in Brindle)
- Black (try using Brava Worsted in Black)
- Jewelry Wire for the eyeglasses
- 3.0 mm Crochet Hook
- Safety Eyes (I used 6.0 mm)
- Poly-fil or any Polyester Stuffing of your choice
- Yarn Needle
- Stitch Markers
- Scissors
Stitches & Abbreviations
- st/sts - stitch/stitches
- ch - chain
- slst - slip stitch
- sc - single crochet (using the yarn under method)
- sc inc - single crochet increase, 2 single crochets in one stitch
- sc dec - single crochet decrease, single crochet 2 stitches together
- hdc - half double crochet
- dc - double crochet
- BLO - back loops only
- FLO - front loops only
Notes
- I made this amigurumi doll using the "Yarn Under Single Crochet" technique. This technique makes the stitches tighter and appears more aligned.
- I also used a half-color changing technique to achieve cleaner lines when changing colors from one row to another.
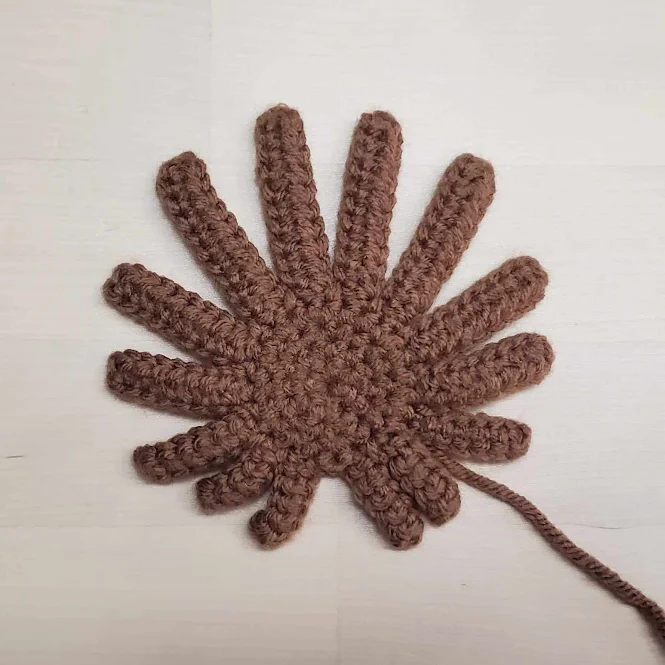
- When working on the hairpiece, I used the underside of the piece as the "outside" or the side that is showing. The curls of the strands will follow a natural curl towards the face.
FREE Amigurumi Crochet Pattern
Head
Using a 3.0 mm crochet hook with peach yarn...
Round 1: Magic Circle with a base of 6 sc (6 sts)
Round 2: Sc inc in each st around (12 sts)
Round 3: [Sc, sc inc] x 6 times (18 sts)
Round 4: [Sc, sc inc, sc] x 6 times (24 sts)
Round 5: [3 sc, sc inc] x 6 times (30 sts)
Round 6: [2 sc, sc inc, 2 sc] x 6 times (36 sts)
Round 7: [5 sc, sc inc] x 6 times (42 sts)
Round 8-14: Sc in each st around (42 sts)
Round 15: [5 sc, sc dec] x 6 times (36 sts)
Round 16: [2 sc, sc dec, 2 sc] x 6 times (30 sts)
Round 17: [3 sc, sc dec] x 6 times (24 sts)
Put in your safety eyes. I put mine between rows 10 and 11, about 7 stitches apart. Stuff the head with poly-fil before the opening gets too small.
Round 18: [Sc, sc dec, sc] x 6 times (18 sts)
Round 19: [Sc, sc dec] x 6 times (12 sts)
Round 20: Sc BLO in each st around (12 sts)
Round 21-23: Sc in each st around (12 sts)
Cut and fasten off. Stuff firmly and push rows 20-23 inside the head to create a tunnel and a hole for the neck to go into later.
Arms (x2)
Using a 3.0 mm crochet hook with peach yarn...
Round 1: Magic Ring with a base of 6 sc (6 sts)
Round 2-3: Sc in each st around (6 sts)
Change to mustard yellow yarn...
Round 4-5: Sc in each st around (6 sts)
Cut and fasten off.
Left Leg
Using a 3.0 mm crochet hook with black yarn...
Round 1: Magic Ring with a base of 5 sc (5 sts)
Round 2: Sc inc in each st around (10 sts)
Round 3: Sc BLO in each st around (10 sts)
Round 4: 6 sc, 2 sc dec (8 sts)
Change to brown yarn...
Round 5-9: Sc in each st around (8 sts)
Cut and fasten off.
Right Leg and Body
Using a 3.0 mm crochet hook with black yarn...
Round 1: Magic Ring with a base of 5 sc (5 sts)
Round 2: Sc inc in each st around (10 sts)
Round 3: Sc BLO in each st around (10 sts)
Round 4: 2 Sc dec, 6 sc (8 sts)
Change to brown yarn...
Round 5-9: Sc in each st around (8 sts)
Do not cut or fasten off, instead, finish off with a Ch 2.
Round 10: Join the second leg with the first leg. 8 sc around the first leg, 2 sc along the ch, 8 sc around the second leg, 2 sc along the other side of the ch (20)
Round 11-12: Sc in each st around (20 sts)
Change to mustard yellow yarn...
Round 13-15: Sc in each st around (20 sts)
Round 16: 4 sc, 6 sc around the first arm, 10 sc, 6 sc around the second arm, 6 sc (32 sts)
Stuff your doll as the opening is getting smaller...
Round 17: Sc dec in each st around (16 sts)
Round 18: Sc dec in each st around (8 sts)
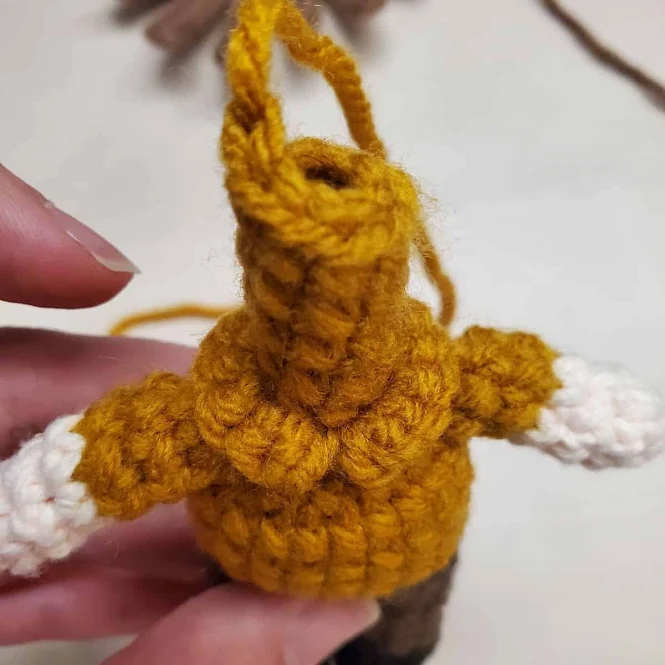
Change to peach yarn (optional, you can continue crocheting with mustard color for the neck since not much is going to show anyway)...
Round 19: Sc BLO in each st around (8 sts)
Round 20-24: Sc in each st around (8 sts)
Cut and fasten off. Leave a long tail to attach the head and the body. See assembly instructions.
Shirt Collar
Work on the front loops from round 19 around the neck with the doll's legs facing towards you. Using a 3.0 mm crochet hook and mustard yellow yarn...
Row 1: Sc join to the FLO from round 19 (start at the front of the doll to create the collar), sc inc in each st around (16 sts)
Do not join to the first st because you want it to look like a dress shirt collar.

Cut and fasten off.
Tie
Using a 3.0 mm crochet hook with brown yarn...
Row 1: Ch 6, working in the back bumps of the ch, sc into the second ch from the hook and down the ch (5 sts)
Cut and fasten off.
Hair Wig
Using a 3.0 mm crochet hook and lighter brown yarn...
Round 1: Magic Circle with a base of 6 sc (6 sts)
Round 2: Sc inc in each st around (12 sts)
Round 3: [Sc, sc inc] x 6 times (18 sts)
Round 4: [Sc, sc inc, sc] x6 times (24 sts)
Strand 1: Ch 6, sc into the 2nd ch from the hook and up the ch, then slst into the next st on round 4 (5 sts)
Strand 2: Ch 6, sc into the 2nd ch from the hook and up the ch, then slst into the next 3 st on round 4 (5 sts)
Strand 3-4: Ch 6, sc into the 2nd ch from the hook and up the ch, then slst into the next st on round 4 (5 sts)
Strand 5: Ch 7, sc into the 2nd ch from the hook and up the ch, then slst into the next st on round 4 (6 sts)
Strand 6: Ch 9, hdc into the 3rd ch from the hook and up the ch, skip 1, then slst into the next st on round 4 (7 sts)
Strand 7: Ch 10, hdc into the 3rd ch from the hook and up the ch, skip 1, then slst into the next st on round 4 (8 sts)
Strand 8-11: Ch 12, hdc into the 3rd ch from the hook and up the ch, skip 1, then slst into the next st on round 4 (10 sts)
Strand 12: Ch 10, hdc into the 3rd ch from the hook and up the ch, skip 1, then slst into the next st on round 4 (8 sts)
Strand 13: Ch 9, hdc into the 3rd ch from the hook and up the ch, skip 1, then slst into the next st on round 4 (7 sts)
Strand 14: Ch 7, sc into the 2nd ch from the hook and up the ch, then slst into the next st on round 4 (6 sts)

Attach the wig to the top of the head, the "wrong side" (as appears above) of the crochet piece facing up.
Assembly


Use the long tail from the body/neck to string through the tunnel on the bottom of the headpiece and secure it together.
Did you make your own assistant to the regional manager? I'd love to see it! Please share it with me on Instagram and/or use the #onceuponacheerio hashtag.
This is an original crochet pattern written by Juli Anne of Once Upon a Cheerio. Please do not claim this crochet pattern as your own. If you wish to share this crochet pattern, you may link to this blog post but please do not reprint it on your site. You may keep a copy for personal use but please DO NOT sell or distribute the crochet pattern.
You may sell products made from this crochet pattern, but please clearly credit the design to me, Juli Anne of Once Upon a Cheerio and provide a link to my blog www.OnceUponaCheerio.com. Permission is NOT granted for mass production or factory manufacturing of any kind. Thank you for understanding!
You may sell products made from this crochet pattern, but please clearly credit the design to me, Juli Anne of Once Upon a Cheerio and provide a link to my blog www.OnceUponaCheerio.com. Permission is NOT granted for mass production or factory manufacturing of any kind. Thank you for understanding!


Love it!!!
If you could do a Pam or a Jim would be perfect
Haha!! If I have time, I will definitely consider it!
Post a Comment