Have you watched Pixar's Turning Red?
I didn't think to watch this movie initially, but I kept seeing the trailers on TV and I couldn't help myself but be curious. The initial movie reviews were quite polarized, but then knowing that the movie is about an Asian Canadian teenager, I knew I had to watch it.
Turns out: this movie SPEAKS. TO. ME.
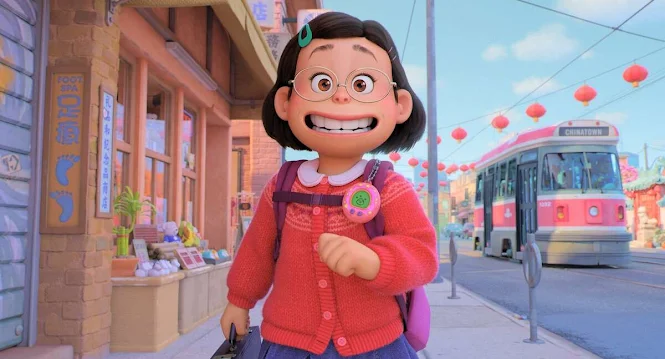
All the nostalgia from the movie just brings me back to my early teen years. The Tamagotchis, the boy bands, high school crushes, etc.
I wouldn't say that I had a controlling mother like Mei Mei does, but I do remember back in the day when I started listening to my own music and becoming my own person.

My mom HATED it because she thought they were bad influences (I'm talking about the Backstreet Boys, Spice Girls, and NSYNC era). I wore her down though -- after I made her listen to it over and over again in the car.

Nowadays, I'm having a lot of fun watching my kids singing and dancing to 4*TOWN. I'm sure there will come a day when they start listening to music I don't like. But I'll worry about that when the time comes.
On a side note, they need more Red Panda merchandise and make a Turning Red Tamagotchi, like NOW. The shopping selection for Turning Red products at Disneyland was just too small.

I know that 4*TOWN (the band from the movie) only has a few songs, but I thought they were all great songs and catchy. I end up downloading, listening, and singing along to it with my kids in the car.
Wouldn't it be so cool to have a 4*TOWN live (but short) concert at Disneyland as a live show? The little kids would LOVE that! C'mon Disney, I'm giving you free ideas here!
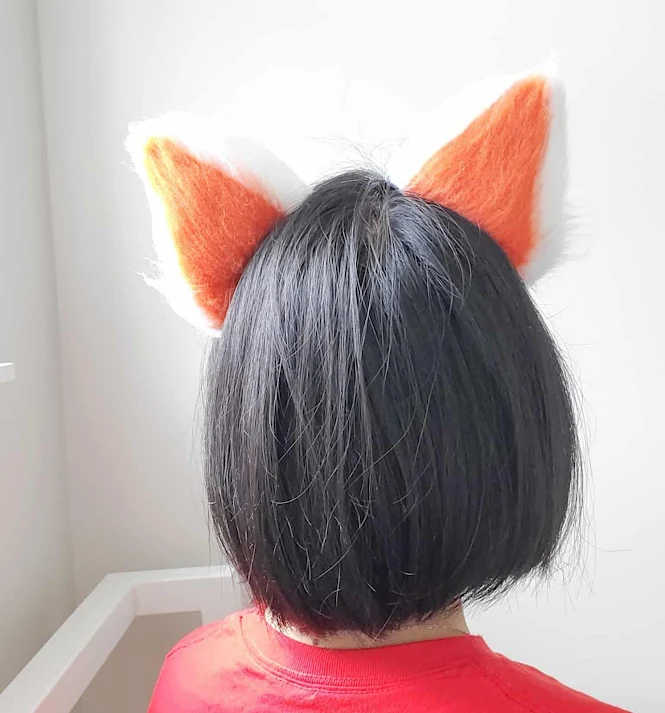
It's so cute. After watching this movie, sometimes Mui Mui would just walk up to me and whisper, "Release the panda..." 🤣! So let's all release our pandas and make these adorable fluffy red panda ears!

Remember to like Once Upon a Cheerio on Facebook. I'd also love it if you followed @onceuponacheerio on Instagram!
Don't have time to make it right this instant? Pin it for later!
Fox or Red Panda Ears Crochet Pattern FREE

What You Need / Materials
Most of these items can be purchased through our affiliate links. Purchasing items through these links will not cost you any extra money. Please see our disclosure policy for more details.- Worsted weight yarn in the following colors:
- White (I used Loops and Threads Impeccable in White)
- Pumpkin (I used Loops and Threads Impeccable in Pumpkin)
- 4.5 mm Crochet Hook
- Headband
- Slicker Brush
- Yarn Needle
- Stitch Markers
- Scissors
Stitches & Abbreviations
- st/sts - stitch/stitches
- sc - single crochet
- sc inc - single crochet increase, 2 single crochets in one stitch
Notes
- I made this amigurumi doll using the "Yarn Under Single Crochet" technique. This technique makes the stitches tighter and appears more aligned.
- You can try using the regular single crochet stitches (yarn over), but I don't know if that would create a steeper slant than mine.
Pattern
Ear #1
Using white yarn...
Round 1: Magic Ring with a base of 4 sc (4 sts)
Round 2: Sc inc in each st around (8 sts)
Round 3: (Sc, sc inc) x 4 times (12 sts)
Round 4: Sc inc, 2 sc, [change to orange yarn, sc, sc inc, sc], change back to white yarn, 2 sc, sc inc, 2 sc, sc inc (16 sts)
Round 5: 2 sc, sc inc, sc, [change to orange yarn, 3 sc, sc inc], change back to white yarn, 2 sc, sc inc, 4 sc, sc inc (20 sts)
Round 6: 2 sc, sc inc, 2 sc, [change to orange yarn, 4 sc, sc inc], change back to white yarn, 2 sc, sc inc, 6 sc, sc inc (24 sts)
Round 7: 2 sc, sc inc, 3 sc, [change to orange yarn, 5 sc, sc inc], change back to white yarn, 2 sc, sc inc, 8 sc, sc inc (28 sts)
Round 8: 2 sc, sc inc, 4 sc, [change to orange yarn, 6 sc, sc inc], change back to white yarn, 2 sc, sc inc, 10 sc, sc inc (32 sts)
Round 9: 2 sc, sc inc, 5 sc, [change to orange yarn, 7 sc, sc inc], change back to white yarn, 2 sc, sc inc, 12 sc, sc inc (36 sts)
Round 10: 2 sc, sc inc, 6 sc, [change to orange yarn, 8 sc, sc inc], change back to white yarn, 2 sc, sc inc, 14 sc, sc inc (40 sts)
Round 11: 2 sc, sc inc, 7 sc, [change to orange yarn, 9 sc, sc inc], change back to white yarn, 2 sc, sc inc, 16 sc, sc inc (44 sts)
Round 12: 2 sc, sc inc, 8 sc, [change to orange yarn, 10 sc, sc inc], change back to white yarn, 2 sc, sc inc, 18 sc, sc inc (48 sts)
Round 13: 2 sc, sc inc, 9 sc, [change to orange yarn, 11 sc, sc inc], change back to white yarn, 2 sc, sc inc, 20 sc, sc inc (52 sts)
Round 14: 2 sc, sc inc, 10 sc, [change to orange yarn, 12 sc, sc inc], change back to white yarn, 2 sc, sc inc, 22 sc, sc inc (56 sts)
Round 15: 2 sc, sc inc, 11 sc, [change to orange yarn, 13 sc, sc inc], change back to white yarn, 2 sc, sc inc, 24 sc, sc inc (60 sts)
Round 16: 2 sc, sc inc, 12 sc, [change to orange yarn, 14 sc, sc inc], change back to white yarn, 2 sc, sc inc, 26 sc, sc inc (64 sts)
Round 17: 2 sc, sc inc, 13 sc, [change to orange yarn, 16 sc], change back to white yarn, 31 sc, sc inc (66 sts)
Round 18: 2 sc, sc inc, 14 sc, [change to orange yarn, 16 sc], change back to white yarn, 32 sc, sc inc (68 sts)
Round 19: 2 sc, sc inc, 15 sc, [change to orange yarn, 16 sc], change back to white yarn, 33 sc, sc inc (70 sts)
Round 20: 2 sc, sc inc, 16 sc, [change to orange yarn, 16 sc], change back to white yarn, 34 sc, sc inc (72 sts)
Ear #2
Round 1: Magic Ring with a base of 4 sc (4 sts)
Round 2: Sc inc in each st around (8 sts)
Round 3: (Sc, sc inc) x 4 times (12 sts)
Round 4: Sc inc, 2 sc, sc inc, 2 sc, [change to orange yarn, sc, sc inc, sc], change back to white yarn, 2 sc, sc inc (16 sts)
Round 5: Sc inc, 4 sc, sc inc, 2 sc, [change to orange yarn, sc inc, 3 sc], change back to white yarn, sc, sc inc, 2 sc (20 sts)
Round 6: Sc inc, 6 sc, sc inc, 2 sc, [change to orange yarn, sc inc, 4 sc], change back to white yarn, 2 sc, sc inc, 2 sc (24 sts)
Round 7: Sc inc, 8 sc, sc inc, 2 sc, [change to orange yarn, sc inc, 5 sc], change back to white yarn, 3 sc, sc inc, 2 sc (28 sts)
Round 8: Sc inc, 10 sc, sc inc, 2 sc, [change to orange yarn, sc inc, 6 sc], change back to white yarn, 4 sc, sc inc, 2 sc (32 sts)
Round 9: Sc inc, 12 sc, sc inc, 2 sc, [change to orange yarn, sc inc, 7 sc], change back to white yarn, 5 sc, sc inc, 2 sc (36 sts)
Round 10: Sc inc, 14 sc, sc inc, 2 sc, [change to orange yarn, sc inc, 8 sc], change back to white yarn, 6 sc, sc inc, 2 sc (40 sts)
Round 11: Sc inc, 16 sc, sc inc, 2 sc, [change to orange yarn, sc inc, 9 sc], change back to white yarn, 7 sc, sc inc, 2 sc (44 sts)
Round 12: Sc inc, 18 sc, sc inc, 2 sc, [change to orange yarn, sc inc, 10 sc], change back to white yarn, 8 sc, sc inc, 2 sc (48 sts)
Round 13: Sc inc, 20 sc, sc inc, 2 sc, [change to orange yarn, sc inc, 11 sc], change back to white yarn, 9 sc, sc inc, 2 sc (52 sts)
Round 14: Sc inc, 22 sc, sc inc, 2 sc, [change to orange yarn, sc inc, 12 sc], change back to white yarn, 10 sc, sc inc, 2 sc (56 sts)
Round 15: Sc inc, 24 sc, sc inc, 2 sc, [change to orange yarn, sc inc, 13 sc], change back to white yarn, 11 sc, sc inc, 2 sc (60 sts)
Round 16: Sc inc, 26 sc, sc inc, 2 sc, [change to orange yarn, sc inc, 14 sc], change back to white yarn, 12 sc, sc inc, 2 sc (64 sts)
Round 17: Sc inc, 31 sc, [change to orange yarn, 16 sc], change back to white yarn, 13 sc, sc inc, 2 sc (66 sts)
Round 18: Sc inc, 32 sc, [change to orange yarn, 16 sc], change back to white yarn, 14 sc, sc inc, 2 sc (68 sts)
Round 19: Sc inc, 33 sc, [change to orange yarn, 16 sc], change back to white yarn, 15 sc, sc inc, 2 sc (70 sts)
Round 20: Sc inc, 34 sc, [change to orange yarn, 16 sc], change back to white yarn, 16 sc, sc inc, 2 sc (72 sts)
Base Sleeve/Attachment
Ch 8
Row 1: Sc into the second ch from the hook and then in each st across (7 sts)
Row 2: Ch 1, turn, sc in each st across (7 sts)
Assembly
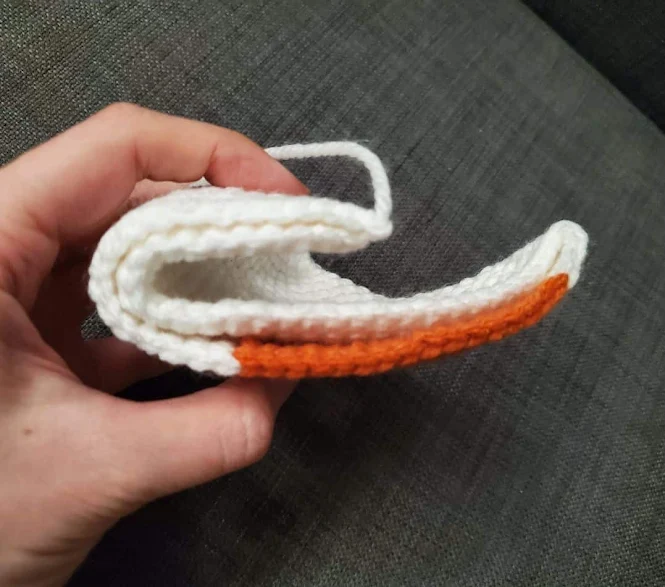
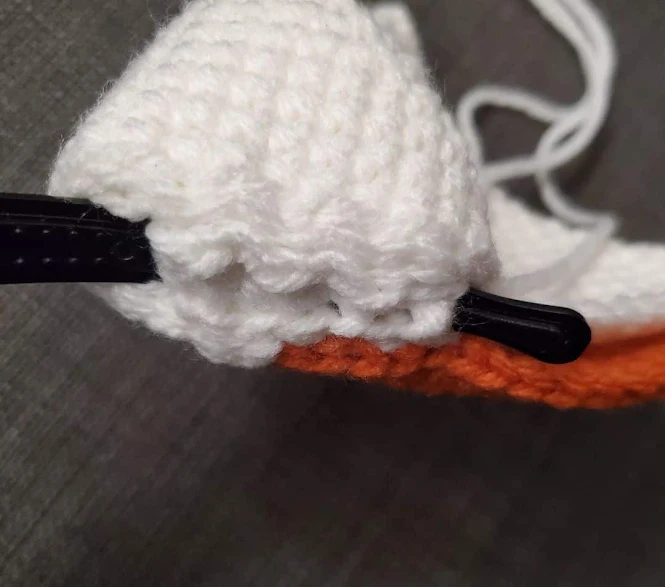
Fold the inside of the ear slightly. Then, sew the small base to the bottom of the ears - only along the dotted lines shown in the photograph.

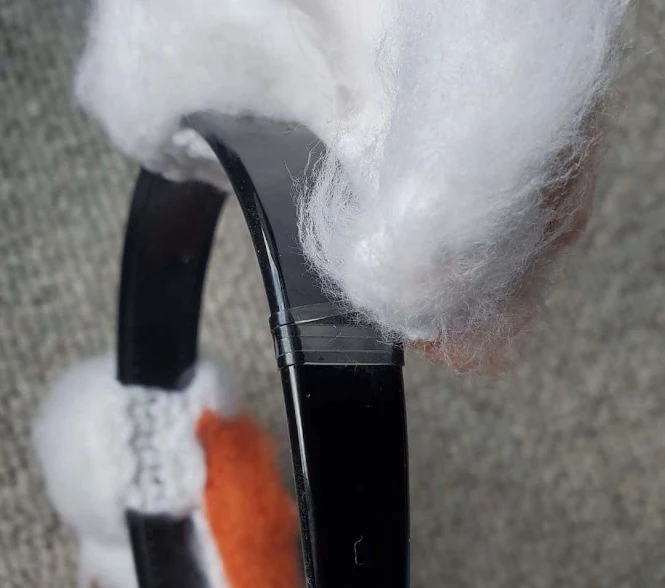
Use a slicker brush and brush it on both the inside and outside of the ears to make it all fluffy. Brush it in all directions to bring up the most hair.
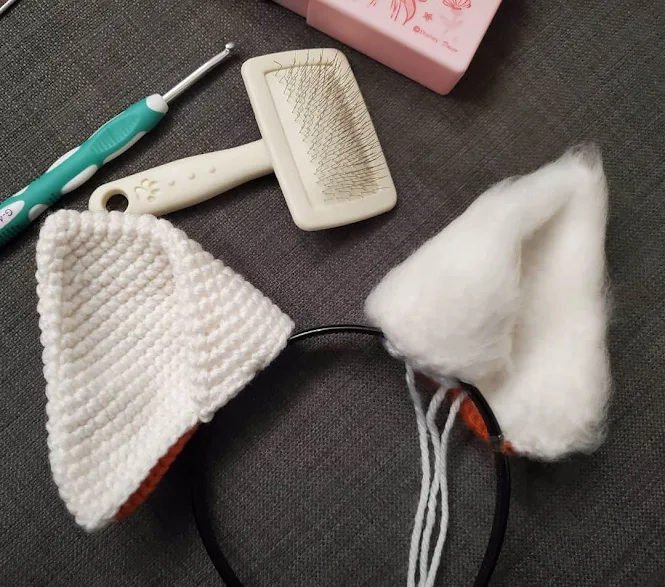

Thread your headband through the small hole between the ear and the base and try to anchor the ear onto the headband to the best of your ability. I ended up using a small rubber band to tie down the opposite corner of the ear.
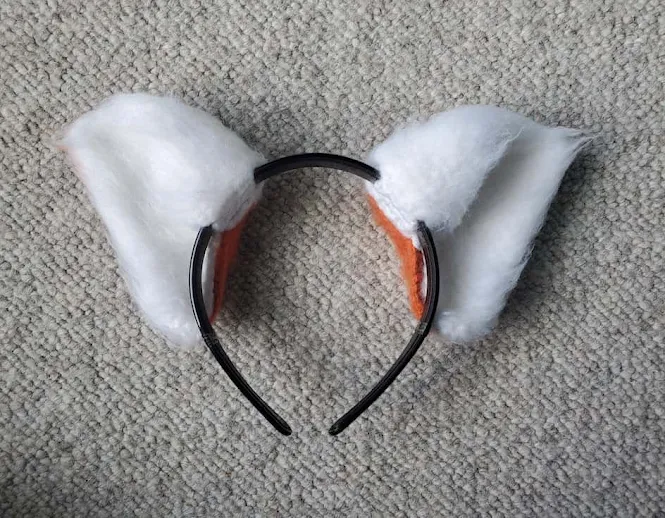
And there you have it: your very own pair of DIY fluffy red panda ears to dress up as Mei Mei from Turning Red!
Did you make your own Red Panda Ears? I'd love to see it! Please share it with me on Instagram and/or use the #onceuponacheerio hashtag.
This is an original crochet pattern written by Juli Anne of Once Upon a Cheerio. Please do not claim this crochet pattern as your own. If you wish to share this crochet pattern, you may link to this blog post but please do not reprint it on your site. You may keep a copy for personal use but please DO NOT sell or distribute the crochet pattern.
You may sell products made from this crochet pattern, but please clearly credit the design to me, Juli Anne of Once Upon a Cheerio and provide a link to my blog www.OnceUponaCheerio.com. Permission is NOT granted for mass production or factory manufacturing of any kind. Thank you for understanding!
You may sell products made from this crochet pattern, but please clearly credit the design to me, Juli Anne of Once Upon a Cheerio and provide a link to my blog www.OnceUponaCheerio.com. Permission is NOT granted for mass production or factory manufacturing of any kind. Thank you for understanding!


Post a Comment