I'm a bit late to the crochet bee trend. But hey, better late than never, right?
Over the last year, the crochet world has been buzzing with bee-themed projects, from simple but adorable pill-shaped amigurumi bees to intricate honeycomb blankets. I couldn't resist jumping on the bandwagon and trying my hand at making my own crochet bee.
With autumn leaves falling and the scent of pumpkin spice in the air, a part of me wondered if I should wait until the new year to share my crochet pattern since they're often associated with spring and summer.
Most of my audience on this blog is from the northern hemisphere and we're approaching the colder months when bees go into hiding. However, I was reminded by some of my fellow crafters that there are crafters and crocheters on the other side of the world that is now welcoming the spring season with open arms.
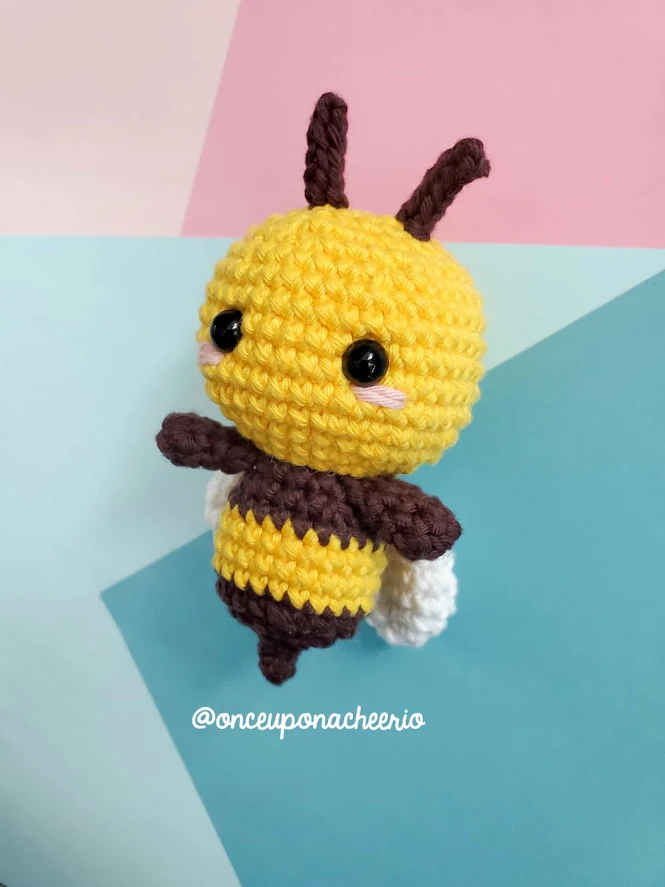
In Australia, New Zealand, and many other places, bees are busy pollinating beautiful blooms right now. Why should they have to wait for a mini crochet bee pattern just because their weather doesn't align with the Northern Hemisphere?
You'll be glad to know that this is a no-sew amigurumi crochet pattern, which means that aside from weaving in your ends, you do not need to use a sewing needle to attach its limbs, wings, or antenna. They are literally crocheted into the rounds of the bumble bee amigurumi.

While I think I prefer the natural zigzag from the color change between the stripes, I also made one using the half-color change method in crochet just to see what it looks like.
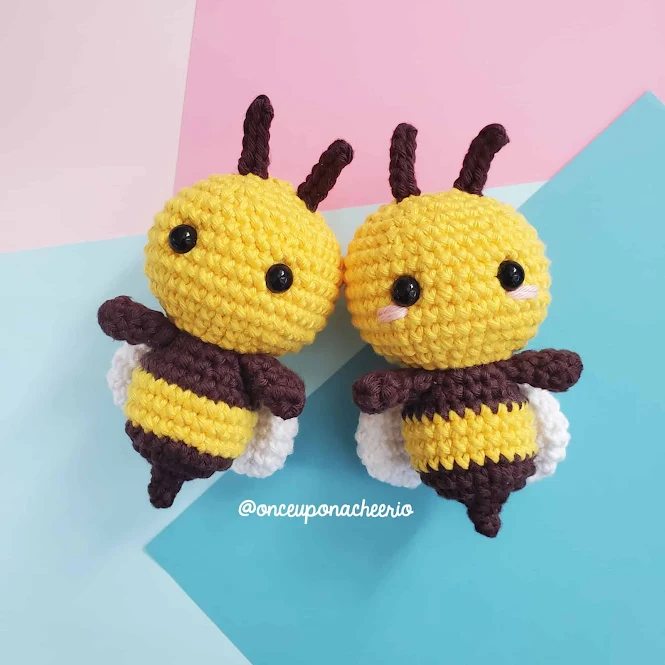
Bees are the unsung heroes of our world. They're so vital to our planet and they play an important role in our ecosystem and fertilize a significant portion of the world's food crops. May our crochet bees serve as a reminder of the importance of preserving bee populations and their habitats.
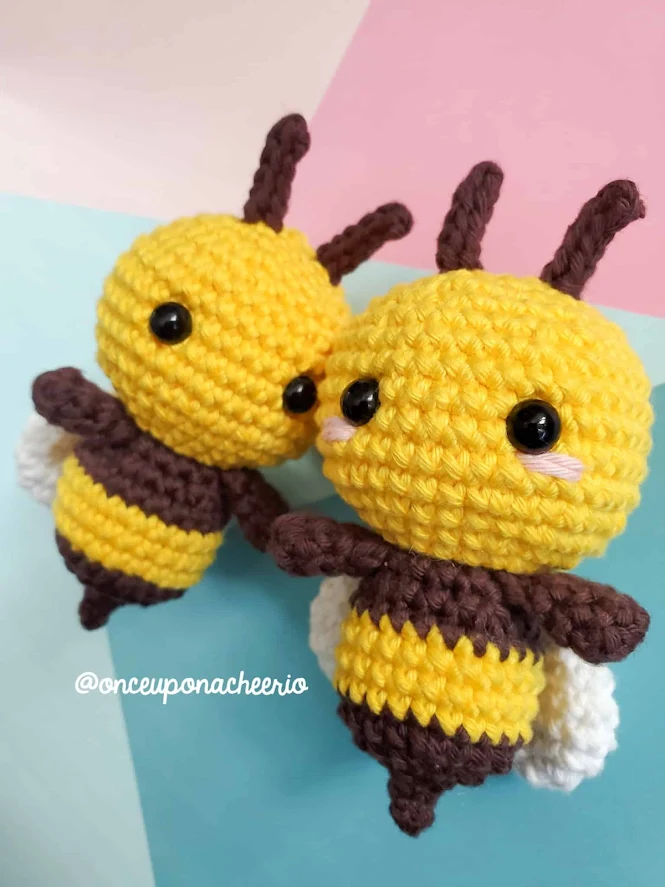
Remember to like Once Upon a Cheerio on Facebook. I'd also love it if you followed @onceuponacheerio on Instagram!
Don't have time to make it right this instant? Pin it for later!
Bumbo the Bee Amigurumi Crochet Pattern

This crochet pattern is available for FREE on this website. If you'd like an ad-free, printable PDF version, you can purchase it for a small fee from my Ravelry shop.
What You Need / Materials
Most of these items can be purchased through our affiliate links. Purchasing items through these links will not cost you any extra money. Please see our disclosure policy for more details.- Worsted weight yarn in the following colors:
- White (I used Hobbii Friends Cotton 8/8 in White #01)
- Brown (I used Hobbii Friends Cotton 8/8 in Americano #20)
- Yellow (I used Hobbii Friends Cotton 8/8 in Sunflower #24)
- Optional: Pink (I used Hobbii Friends Cotton 8/8 in Baby Pink #51) for the blush
- 3.25 mm Crochet Hook
- Safety Eyes (I used 8.0 mm)
- Poly-fil or any Polyester Stuffing of your choice
- Yarn Needle
- Stitch Markers
- Scissors
Stitches & Abbreviations
- st/sts - stitch/stitches
- ch - chain
- slst - slip stitch
- sc - single crochet
- sc inc - single crochet increase, 2 single crochets in one stitch
- sc dec - single crochet decrease, single crochet 2 stitches together
- hdc - half double crochet
- BLO - back loops only
Notes
- I made this amigurumi doll using the "Yarn Under Single Crochet" technique. This technique makes the stitches tighter and appears more aligned.
- Use the ultimate finish to close up the amigurumi.
- Crochet in continuous rounds. Do not join at the end of each round.
- Use a running stitch marker to keep your place when crocheting in rounds.
- Optional: I used the invisible increase and invisible decrease for a nicer finish.
- Optional: I made a version using the half-color changing technique (see the above photos for reference).
- Final Measurements: 10 cm (approx. 4 inches) not including the antennas
- Change to a different yarn weight/category and appropriate hook size for this project to make it bigger/smaller.
- The arms and wings are crocheted onto the body so there's no sewing involved. Follow the order of the pattern and make the arms and wings before making the body and head.
Crochet Pattern
Arms (make 2)
Using a 3.25 mm crochet hook and dark brown color yarn...
Round 1: Magic Ring with a base of 6 sc (6 sts)
Round 2-4: Sc in each st around (6 sts)
Cut and fasten off.
Wings (make 2)
Using a 3.25 mm crochet hook and white color yarn...
Round 1: Magic Ring with a base of 6 sc (6 sts)
Round 2: Sc inc in each st around (12 sts)
Round 3: [Sc, sc inc] x 6 times (18 sts)
Round 4-6: Sc in each st around (18 sts)
Round 7: [Sc, sc dec] x 6 times (12 sts)
Round 8: [Sc, sc dec] x 4 times (8 sts)
Round 9: Sc dec in each st around (4 sts)
Cut and fasten off with a longer tail to use for crocheting to the body later.
Body and Head
Using a 3.25 mm crochet hook and dark brown color yarn...
Round 1: Magic Ring with a base of 3 sc (3 sts)
Round 2: 2 sc, sc inc (4 sts)
Round 3: [Sc, sc inc] x 2 times (6 sts)
Round 4: Sc inc in each st around (12 sts)
Round 5: [Sc, sc inc] x 6 times (18 sts)
Round 6: [Sc, sc inc, sc] x 6 times (24 sts)
Change to yellow color yarn...
Round 7-9: Sc in each st around (24 sts)
Change to dark brown color yarn...
Round 10: Sc in each st around (24 sts)
Round 11: [Sc, sc dec, sc] x 6 times (18 sts)
Change to the white color yarn from the yarn tail from the wing...
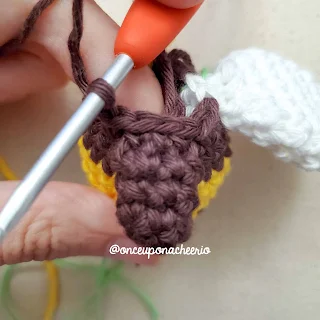
Round 12: 2 sc the wing onto the body


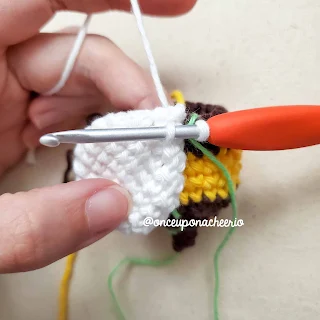

Change back to dark brown color yarn...
2 sc on the body, 3 sc the first arm onto the body, 4 sc on the body, 3 sc the second arm onto the body, and 2 sc on the body.

Change to white color yarn from the yarn tail from the second wing...
2 sc the wing onto the body (18 sts)
Change to yellow color yarn...
Round 13: Slst in each st around (18 sts)


Round 14: [Sc, sc inc, sc] x 6 times (24 sts)
Round 15: [3 sc, sc inc] x 6 times (30 sts)
Round 16: [2 sc, sc inc, 2 sc] x 6 times (36 sts)
Round 17: [5 sc, sc inc] x 6 times (42 sts)
Round 18-22: Sc in each st around (42 sts)
Round 23: [5 sc, sc dec] x 6 times (36 sts)
Round 24: [2 sc, sc dec, 2 sc] x 6 times (30 sts)
Insert safety eyes between Rounds 19 and 20, between 7 sts apart.
(I usually count from where the safety eye is inserted, including the one that the safety eye might be covering once inserted)
Round 25: [3 sc, sc dec] x 6 times (24 sts)
Round 26: [Sc, sc dec, sc] x 6 times (18 sts)
Stuff the amigurumi with polyfill stuffing before closing and fastening off the amigurumi.
Round 27: [Sc, sc dec] x 6 times (12 sts)
Round 28: Sc dec in each st around (6 sts)
Cut and fasten off with a tail.
Use the ultimate finish to close up the top of the head.
Antenna
Using a 3.25 mm crochet hook and brown color yarn... [see photos below]
Row 1: Ch 6, slst into the back bump of the second ch from the hook, 4 slst into the back bumps of the ch across (5 sts)
Cut and fasten off. Weave in the ends.
Insert the hook into the crown of the head off to the side between Rounds 26 and 27, pull up a loop of brown yarn, yarn over, and make the first chain.


Slst down the chain in the back bumps of the chain. Cut and fasten off.


Do the same thing for the second antenna, but insert the hook closer to the crown of the head between rounds 27 and 28 so that the antennas would face the same direction when finished.

Blush (optional)
Use pink yarn and embroider some pink for blush on the amigurumi bee under the eyes.
Did you make your own Bumbo the Amigurumi Bee? I'd love to see it! Please share it with me on Instagram and/or use the #onceuponacheerio hashtag.
This is an original crochet pattern written by Juli Anne of Once Upon a Cheerio. Please do not claim this crochet pattern as your own. If you wish to share this crochet pattern, you may link to this blog post, but please do not reprint it on your site. You may keep a copy for personal use, but please DO NOT sell or distribute the crochet pattern.
You may sell products made from this crochet pattern, but please clearly credit the design to me, Juli Anne of Once Upon a Cheerio, and provide a link to my blog www.OnceUponaCheerio.com. Permission is NOT granted for mass production or factory manufacturing of any kind. Thank you for understanding!
You may sell products made from this crochet pattern, but please clearly credit the design to me, Juli Anne of Once Upon a Cheerio, and provide a link to my blog www.OnceUponaCheerio.com. Permission is NOT granted for mass production or factory manufacturing of any kind. Thank you for understanding!


Your amigurumi bee turned out so cute! Great tutorial! I wanted to drop a quick message to let you know that I’ve featured your project on Crafts on Display, hope you enjoy it! https://craftsondisplay.com/crochet/no-sew-amigurumi-bee-crochet-pattern-95987/
Do you have a video of the stitches for the antennas? I couldn't quite follow it, and while they turned out cute enough, it's definitely not exactly what you did
Hello! Sorry. I don't have a video of how I attached the antennas. There are only photographs as part of the amigurumi pattern.
Thank you so much for the feature! <3
Post a Comment