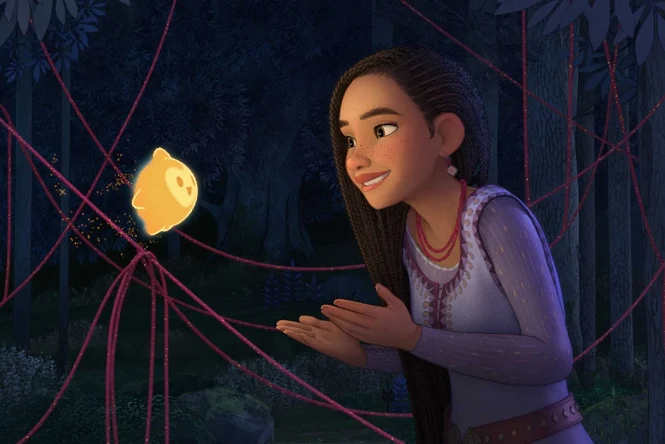
Disney brought their iconic wishing star to life in their latest animated film, Wish. Knowing that we were going to Disneyland at the end of November, just shortly after the movie's release, we made an effort to watch it just before heading to Los Angeles.

(Photo Credit: Disney)
We were captivated by the whimsical charm of the wishing star in the movie. Star doesn't have any dialogue throughout the film but instead uses a ball of red yarn to craft costumes and communicate its thoughts. As soon as I saw the yarn, I knew Star and I spoke the same language.
With Mui Mui's enthusiasm, she wanted to bring home the largest wishing star plush toy. She was lucky I was feeling generous that day.

We then brought home a few more Wishing Star souvenirs from the park including the light-up sipper and a smaller plush toy, which has also been claimed by Mui Mui since we returned from our trip.

Feeling inspired by the magic of our Disneyland vacation, I decided to make a miniature crochet version of the beloved Star once I had access to my yarn again.
Like some of my other mini amigurumi crochet patterns, this miniature amigurumi wishing star is small enough to make into a crochet keychain.

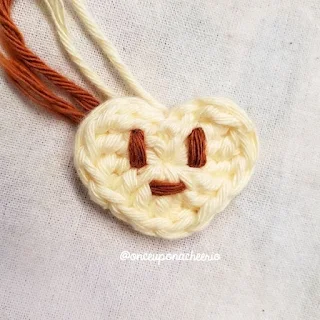
This miniature crochet Wishing Star is mostly crafted in one piece using bobble stitches for its star spikes and then the face is sewn on separately. I hope this crochet tutorial will inspire you to make your own amigurumi wishing star.
Remember to like Once Upon a Cheerio on Facebook. I'd also love it if you followed @onceuponacheerio on Instagram!
Don't have time to make it right this instant? Pin it for later!
Mini Wishing Star Amigurumi Pattern

What You Need / Materials
Most of these items can be purchased through our affiliate links. Purchasing items through these links will not cost you any extra money. Please see our disclosure policy for more details.- Worsted weight yarn in the following colors:
- Dark Yellow (I used Hobbii Friends Cotton 8/8 in Sunflower #24)
- Light Yellow (I used Hobbii Friends Cotton 8/8 in Pastel Yellow #21)
- Brown (I used Hobbii Friends Cotton 8/8 in Caramel #14)
- 3.25 mm Crochet Hook
- Poly-fil or any Polyester Stuffing of your choice
- Yarn Needle
- Stitch Markers
- Scissors
Stitches & Abbreviations
- st/sts - stitch/stitches
- ch - chain
- slst - slip stitch
- sc - single crochet
- sc inc - single crochet increase, 2 single crochets in one stitch
- sc dec - single crochet decrease, single crochet 2 stitches together
- dc - double crochet
- tr - treble crochet (i.e. triple crochet)
- Yarn over twice and insert the hook into the stitch. Yarn over, pull through 2 loops (repeat 3 times).
- bbl - bobble stitch
- Yarn over and insert the hook into the stitch. Yarn over and pull through. Yarn over and pull through 2 loops. Repeat until you have 6 loops on the hook. Yarn over and pull through all of the loops on the hook. Push the bobble stitch forward towards you when you sc into the next stitch.
Notes
- I made this amigurumi doll using the "Yarn Under Single Crochet" technique. This technique makes the stitches tighter and appears more aligned.
- Crochet in continuous rounds. Do not join at the end of each round. Use a running stitch marker to keep your place when crocheting in rounds.
- Use invisible decreases when making single crochet decreases for a nicer finish.
- There are many stitches in the magic ring that make the heart face. Use a double magic ring for a more secure hold.
- Optional: invisible increase
Crochet Pattern
Heart Face
Using a 3.25 mm crochet hook and light yellow yarn...
Round 1: Magic ring, ch 2, 3 tr, 3 dc, 1 tr, 3 dc, 3 tr, ch 2, slst into the magic ring. Close the magic ring to close it off.

Use brown yarn to embroider a face on the light yellow heart.


Yellow Star
Using a 3.25 mm crochet hook and dark yellow yarn...
Round 1: Magic ring with a base of 6 sc (6 sts)
Round 2: Sc inc in each st around (12 sts)
Round 3: [Sc, sc inc] x 6 times (18 sts)
Round 4: [Sc, sc inc, sc] x 6 times (24 sts)
Round 5: [3 sc, sc inc] x 6 times (30 sts)
Round 6: Sc in each st around (30 sts)
Round 7: Bbl, 7 sc, bbl, 4 sc, bbl, 3 sc, bbl, 4 sc, bbl, 7 sc (30 sts)
Round 8: Sc in each st around (30 sts)
You can sew the heart face onto the yellow star and hide all the ends inside the amigurumi wishing star before closing up the amigurumi. You can also sew the heart face onto the amigurumi star afterward if you prefer.
Round 9: [3 sc, sc dec] x 6 times (24 sts)
Round 10: [Sc, sc dec, sc] x 6 times (18 sts)
Round 11: [Sc, sc dec] x 6 times (12 sts)
Cut and fasten off using the ultimate finish.
If you feel that the hole is too big and/or you don't want to use the ultimate finish, you can make an extra round of sc dec in each st around and close off the amigurumi.


Did you make your own Amigurumi Wishing Star? I'd love to see it! Please share it with me on Instagram and/or use the #onceuponacheerio hashtag.
This is an original crochet pattern written by Juli Anne of Once Upon a Cheerio. Please do not claim this crochet pattern as your own. If you wish to share this crochet pattern, you may link to this blog post, but please do not reprint it on your site. You may keep a copy for personal use, but please DO NOT sell or distribute the crochet pattern.
Disclaimer: We are not affiliated, associated, authorized, endorsed by, or in any way officially connected with The Walt Disney Company, Disney Enterprises, Inc., or any of its subsidiaries or affiliates. Star from Disney's Wish Movie is a trademarked character owned by Disney. Please reserve this crochet pattern and the finished product for personal use ONLY.
Disclaimer: We are not affiliated, associated, authorized, endorsed by, or in any way officially connected with The Walt Disney Company, Disney Enterprises, Inc., or any of its subsidiaries or affiliates. Star from Disney's Wish Movie is a trademarked character owned by Disney. Please reserve this crochet pattern and the finished product for personal use ONLY.


Post a Comment